
Installation Skype for Business 2015 BackEnd Server (SQL Server 2016 and File Store)
- Schmid Thomas
- 27. Aug. 2016
- 3 Min. Lesezeit
Aktualisiert: 21. Juli 2024
Installation v-server-23 SQL Server
Verbinden sie die ISO Datei mit der virtuellen Maschine in der sie den SQL Server 2016 installieren möchten.
Öffnen sie den Windows Explorer
Fenster "This PC"
Doppelklick auf DVD Drive (D:) SQL2016_x64_ENU >

Fenster "User Account Control - Do you want to allow the following program to make changes to this computer?"
Yes >

Fenster "SQL Server 2016 - Please wait while Microsoft SQL Server 2016 Setup processes the current operation."

Fenster "SQL Server Installation Center"
Installation >

Fenster "SQL Server Installation Center"
New SQL Server stand-alone installation or add features to an existing installation >

Fenster "SQL Server 2016 - Please wait while Microsoft SQL Server 2016 Setup processes the current operation."

Fenster "SQL Server 2016 Setup - Product Key"
[x] Enter the product key
Eingabe xxxxx-xxxxx-xxxxx-xxxxx-xxxxx (Geben sie ihren erworbenen Produktschlüssel ein.)
Next >

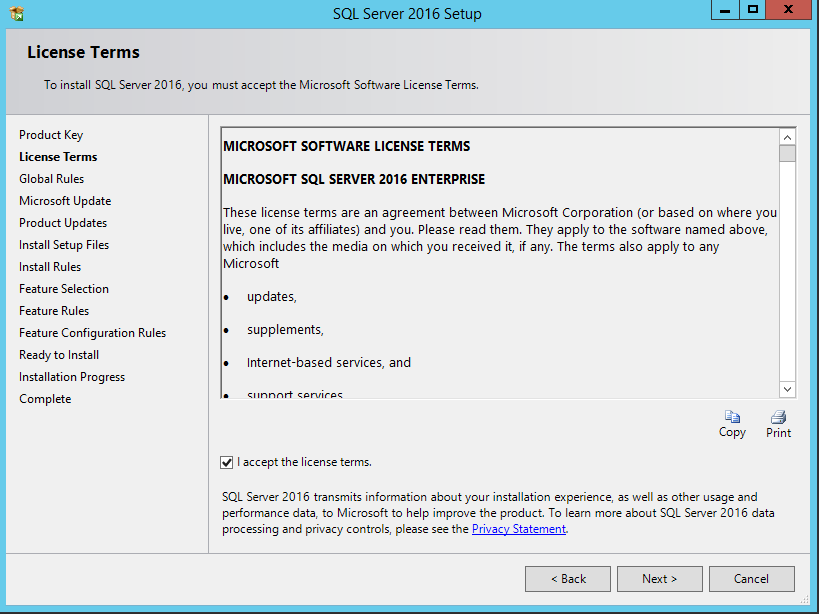
Fenster "SQL Server 2016 Setup - License Terms"
[x] I accept the license terms.
Next >
Fenster "SQL Server 2016 Setup - Global Rules"
Nun werden die Globalen Regeln überprüft.
Next > (Sollte automatisch weiter gehen wenn keine Ungereimtheiten gefunden wurden)

Fenster "SQL Server 2016 Setup - Microsoft Update"
[x] Use Microsoft Update to check for updates (recommended)
Next >

Fenster "SQL Server 2016 Setup - Install Rules"
Windows Firewall Warning
In unserem Beispiel deaktivieren wir auf dem SQL Server die Windows Firewall (nicht empfohlen). Wir werden in einem spätere Blog auf die Windows Firewall Konfiguration in Bezug mit Skype for Business 2015 eingehen.

Öffnen sie die Systemsteuerung.
Rechte Maustaste auf das Windows Start Symbol >
Kontextmenü Control Panel >

Fenster "Control Panel"
View by auf Small icons >

Fenster "All Control Panel Items"
Windows Firewall >

Fenster "Windows Firewall"
Turn Windows Firewall on or off >

Fenster "Customize Settings"
Abschnitt "Domain network settings"
[x] Turn off Windows Firewall (not recommended)
Abschnitt "Private network settings"
[x] Turn off Windows Firewall (not recommended)
Abschnitt "Public network settings"
[x] Turn off Windows Firewall (not recommended)
OK >

Fenster "Windows Firewall"
X (Schliessen) >

Fenster "SQL Server 2016 Setup - Install Rules"
Re-run >

Fenster "SQL Server 2016 Setup - Install Rules"
Nun sollten alle Rules bestanden werden.
Das Fenster geht automatisch auf den nächsten Installationsschritt wenn alle Install Rules bestanden wurden.
Next >

Fenster "SQL Server 2016 Setup - Feature Selection"
Auswahl
Instance Features
[x] Database Engine Services
[ ] SQL Server Replication
[ ] R Services (In-Database)
[ ] Full-Text and Sematic Extractions for Search
[ ] Data Quality Services
[ ] PolyBase Query Service for External Data
[ ] Analysis Services
[ ] Reporting Services - Native
Shared Features
[ ] R Server (Standalone)
[ ] Reporting Services - SharePoint
[ ] Reporting Services Add-in for SharePoint Products
[ ] Data Quality Client
[ ] Client Tools Connectivity
[ ] Integration Services
[ ] Client Tools Backwards Compatibility
[ ] Client Tools SDK
[ ] Documentation Components
[ ] Distributed Replay Controller
[ ] SQL Client Connectivity SDK
[ ] Master Data Services
Redistributable Features
Ändern sie die Installationspfade nach Ihren wünschen.
Eingabe Instance root directory: C:\Program Files\Microsoft SQL Server\
Eingabe Shared feature directory: C:\Program Files\Microsoft SQL Server\
Eingabe Shared feature directory (x86): C:\Program Files (x86)\Microsoft SQL Server\
Next >

Fenster "SQL Server 2016 Setup - Feature Rules"
Fehlgeschlagen wegen KB2919355 Installation.

Laden sie den Hotfix von https://support.microsoft.com/kb/2919355 herunter.

Klicken sie doppelt auf das Icon Windows8.1-KB2919355-x64.cab.

Fenster "Windows Updates Standalone Installer"

Fenster "SQL Server 2016 Setup - Feature Rules"
Nach der Installation des Updates sollten jetzt keine Fehler mehr erscheinen.
Next >

Fenster "SQL Server 2016 Setup - Instance Configuration"
[x] Default instance
Eingabe Instance ID: MSSQLSERVER
Next >

Fenster "SQL Server 2016 Setup - Server Configuration"
Register "Service Accounts"
Next >

Fenster "SQL Server 2016 Setup - Database Engine Configuration"
[x] Windows authentication mode
Add Current User >
Next >

Fenster "SQL Server 2016 Setup - Ready to Install"
Install >

Fenster "SQL Server 2016 Setup - Installation Progress"
Die Installation wird durchgeführt.

Fenster "Computer restart required"
OK >

Fenster "SQL Server 2016 Setup - Complete"
Close >

Fenster "SQL Server Installation Center"
X (Schliessen) >

Starten sie den Server neu und erstellen sie nach dem Neustart den SkypeFileShare anhand folgender Anleitung.
Commenti